![]()
When the above notice appears ahead of a section of these classes, I invite you to ‘listen’ to the section while you follow the printed words. The notice suggests you ‘Press’ (select or touch) the universal symbol for ‘PLAY’ in the control section to the right of or just below the notice. Once you have done so, the control keys on your keyboard can be used to control the audio: play/pause, Mute, increase or decrease the volume.
If you are not familiar with the audio control keys on your computer, please select the ‘Tips & Shortcuts’ button in the left column, then read or print and read the PDF file ‘Controlling Your Computer’s Audio’.
Class 5
![]()
Why is a File Folder so Important?
This class (Class 5) is intended to help you learn how to organize the storage system of your computer by showing you that everything you ‘put away’ (store or save) in real life can be ‘put away’ on a computer in a very similar manner.
Probably the most difficult thing to understand about personal computers is that they are a digital device. We (people 65 and older) come from an analog world and are being dragged into the digital world kicking and screaming. You may even have heard we are just a number now. That, actually, is partly true but not in the way you think. I expect you think of it as if you are #35,892,583 out of 300 million or so. But actually…
In Class 4 I talked about computer files and how they store information, particularly as a series of Bytes, or characters. Therefore, my name, William, written in the ASCII digital code would be: 87 105 108 108 105 97 109. Yup! Its a series of numbers, not a single number. One number for each character!
Ok, so what IS the difference between analog and digital. When humans speak to each other, our vocal cords vibrate and generate sounds most other humans can ‘hear’. That is an analog operation. When we ‘talk’ to a computer, we usually are using a ‘keyboard’. The keyboard converts (digitizes) what we type into the ASCII code the computer ‘understands’. That’s digital. If you can use your voice to control your computer, the sound you make (analog) is converted into a sound file (digitized) before the computer can recognize it as a command. That’s also digital.
EVERYTHING you want a computer to manipulate has to be digital, therefore it has to be digitized. That is what applications do to our information. They digitize it! The result is a file, and all files are stored in folders.
Naming your files
That brings up a VERY important, but rarely discussed file naming structure. The most important thing to remember is the file name consists of two parts: A name, and an extension. The name part you get to choose, but the extension is given a file by the application that digitizes it. THE EXTENSION MUST NOT BE CHANGED!!!
The extension ( file: name.ext ) is how the computer recognizes which application digitized it and which applications can display the file in a manner that humans will recognize. The name and the extension are separated by a period.
When humans learn to pay attention to the extension, they rapidly learn what kind of file they have, and begin refering to the file by its extension. For example: “I have sent you a PDF and a JPG.” PDF stands for Portable Document Format, the most popular file format to email someone because it doesn’t require the recipient to own the application that generated the document…ANY computer can run a free application that lets a human ‘read’ PDF documents. Similarly, JPG or JPEG (usually pronounced: ‘J-Peg’) indicates the file is a photo using a special compression technique defined by the ‘Joint Photographic Experts Group’.
Princeton University Library has a number of file naming best practices, including the following:
- File names should be short but descriptive (less than 25 characters).
- Avoid special characters or spaces in a file name.
- Use capitals and underscores instead of periods or spaces or slashes.
Managing our digital information
In Class 4, you learned that a file manager (in Windows 10 and 11; Windows File Explorer, the file folder icon on your task bar) is there to provide you the capability to: Create a folder, Rename a file or folder, Search for a file or folder and Move or Copy a file or folder. In other words; a file manager is an application that lets you manage your file system! It makes no difference if the file is a document, photo, video or music; they are all files, and the file manager handles all files the same way.
Flash Drives: a versatile, portable storage system
Class 5 exercises make numerous references to a ‘flash drive’. If you are not familiar with the term or the device, please click on the ‘Tips and Shortcuts’ button near the top of the left column. Read or print and read the PDF document: “Buying and Using a Flash Drive”.
NOTE: For these exercises I prepared a USB flash drive (labeled: Flash-Drive to make it easy to find with the file manager!) with appropriate folders to follow the exercises. In a physical presence class, I can pass out copies of the flash drive so the class can follow what I am talking about. In this on-line class I have provided you with two methods of doing the exercises. First, photos you can view as you read through the example. Second, the ability to download and use a ‘Virtual Flash Drive’ complete with the folders of interest, so you can practice the exercises on your own computer.
Also note: The folders I have put on the flash drive are just enough to let you work through the examples. I don’t have the time or inclination to generate a full version of the atlas or kitchen.
If you wish to follow the exercises with a ‘Virtual Flash Drive’ on your own computer, please click on the ‘Tips & Shortcuts’ button near the top of the left column. Look for and read or print and read the PDF document “Setup Virtual Flash Drive”. Otherwise, read on!
The Class Synopsis follows this paragraph. You should notice that individual sections of this class are colored and underlined, indicating that they are LINKS to the appropriate sections. You may click or touch individual sections to jump to them, or simply scroll down (turn the mouse wheel, if it has one) to the section you wish to continue with.
Class 5 Synopsis:
- Working with more than one window at the same time
- Containers, revisited
- Navigating a computer atlas (folder)
- Navigating a computer kitchen (folder)
1) Working with more than one window at the same time
![]()
Occasionally it would be very convenient to have two (or more) windows (applications) open at the same time. Usually, you will work with different applications open at a time. However, once in a great while, two windows of the same application make things either easier or more understandable.
Information you need to know before starting the exercise:
- A digital camera flash memory card (solid state memory), like a CD, is a memory without an electronic and/or mechanical drive to connect the memory to the computer. Many current computers have a port (slot) that will accept SD flash memory cards. The computer then contains the necessary electronics to read and write data from/to the flash memory card.
- Digital cameras use a flash memory card instead of film, therefore come with a USB cable that allows you to connect your camera (with memory card in the camera) to a USB port (connector) on the computer, thus providing the necessary electronics to communicate with the camera's digital film.
- In the event that neither method works for you; you may also obtain a USB flash memory card reader. The flash memory card is plugged into the reader, then the combination is plugged into a USB port on the computer. A single reader may be able to handle several types of flash memory cards available.
- A USB flash drive is just a flash memory card with built in USB drive electronics and connector to plug into one of the computers’ USB ports.
Reminder: The Windows File Explorer application (file manager) manages ALL files and folders the same way! This first exercise copies or moves files (and/or folders) from one memory to another. ALL external USB connected memory devices (hard drives, solid state drives, CD/DVDs in optical drives, floppy discs and flash drives), as well as the internal permanent storage memory (hard drive or solid state drive) are the same kind of memory as far as the file manager is concerned, and they ALL work the same way! This feature of the operating system allows you to copy/move files from any memory storage device to another.
The physical size and shape of the memory makes no difference! Learn to move or copy a file (or folder) using one type of memory, and you know how to use them all.
The first exercise premise:
Did you like word problems in high school? Many of us did NOT! We are going to work through a word problem together. This problem is one many of us have thought about, maybe even are taking this series of classes to help solve. You may mentally modify this task to fit your actual situation; here is the idea:
You have either a USB flash drive (flash memory permanent storage with computer interface drive electronics built in) or a digital camera flash memory card (permanent storage, but has no computer interface drive electronics) that has important photos (or videos, music, documents, etc., all of which are files) stored on it. You wish to copy them to your computers' hard drive, but you are worried you may delete or loose them.
The actual exercise
Once your confidence level in using the file manager to copy or move files (and folders) goes up, you will use only one file manager window. Until then, we will use what I call the foolproof method to copy or move one or more files or folders. This method is nothing more than having two windows open so you can view the content of two folders at the same time, the first being the folder with the file you want to copy, the second being the folder you wish to copy the file into. The two windows give you the ability to watch the whole process and actually see that you were successful!
- The foolproof method depends on your being comfortable moving your pointing device FROM something TO something. This usually follows the direction you use to read printed information (right to left, or left to right). I will give window placements according to FROM and TO in order to accommodate everyone.
The first part of the exercise is to create (or choose) a folder in which you will place the files you move or copy. For the foolproof method, I call this the TO window.
Mouse Reminder: Select is pointing finger poke, Menu is middle finger poke!
Positioning of the TO window
Step 1) Open Windows File Explorer (the file folder icon on the task bar). If the file manager opened full screen, select the title bar icon that will Restore Down to a smaller size on the desktop. Move your cursor into the title bar, but NOT on an icon, then press down with your pointing finger, and HOLD it there while you drag the cursor OUT of the center of the TO side of the screen.
NOTE: While you are dragging, watch the cursor, not the window! Just as your cursor touches the monitor frame, you will notice a ghost of a window that is half the size of the screen. Let go of the pointing finger button to drop the window there. The result should be a window 1/2 the size of the screen attached to the TO side of your screen!
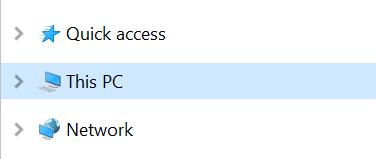
Step 2) We need to reduce the number of open folders so you can see what you are doing. In the navigation pane (left pane) of the file manager window, beginning with the top item; select the arrowhead of every folder in the list that does NOT point toward the icon of the folder. This should result in a look similar to the following illustration:
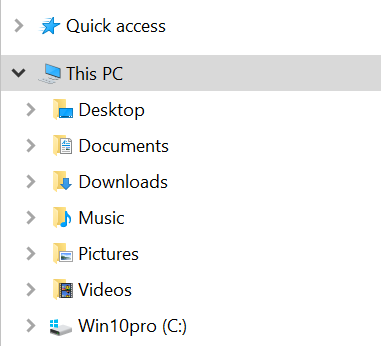
Step 3) Now we are going to open the folder This Pc (or whatever you may have renamed it) to the next level of folders. Select the arrowhead to the left of This Pc folder icon. The arrowhead should now NOT be pointing toward the icon. The resulting list of folders should be similar to the next illustration:
Step 4) The exercise is to copy photographs to a folder of your choice. Copying photos suggests saving them in an album in the Pictures folder. Lets check for current folders inside the Pictures folder. In the navigation pane, select the arrowhead to the left of the Pictures folder icon. The arrowhead turns away from the icon, and any folders IN the Pictures folder are shown below the Pictures folder, and are slightly indented from the Pictures folder as in the next illustration:
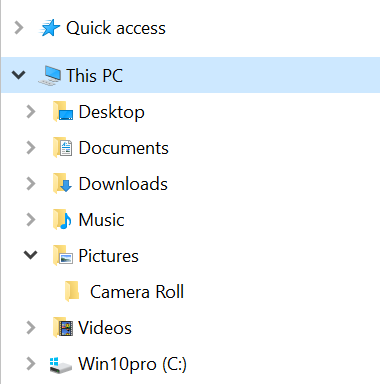
Step 5) In the case shown above, there is only a Camera Roll folder (album) inside the Pictures folder, so we need to create a new folder for our album. Still looking at the navigation pane, we want to create a new folder (Album) IN the Pictures folder, so move your cursor to the Pictures folder name, and menu click. (Windows 11 requires an additional click. At the bottom of the first menu, click on ‘Show more options’). In the resulting menu, select New, then select Folder. Now HANDS OFF THE MOUSE! Your navigation pane should look like the next illustration.:
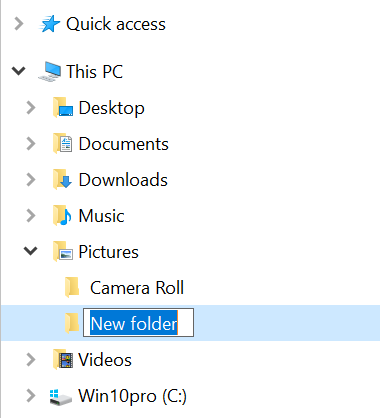
Step 6) The computer presents you with a text box with the words New Folder already highlighted (illustration, above). ANYTHING you type now will replace the words New Folder. If you goofed and actually clicked your mouse (no matter where!), the highlight is no longer there, and you probably have a new folder named New Folder! Otherwise, type the name you want the new folder to have now, while New Folder is highlighted!
In the event your new folder is named New Folder, you will have to rename it; not part of this exercise (see rename, below)! Repeat the step where you create a new folder; but THIS time, don’t click the mouse again until you have finished the new name.
Step 7) When you are done typing the name for your album (I typed Album), poke enter to tell the computer you are done typing. You will now see the folder with the album name you have chosen at the same indent as the Camera Roll folder.
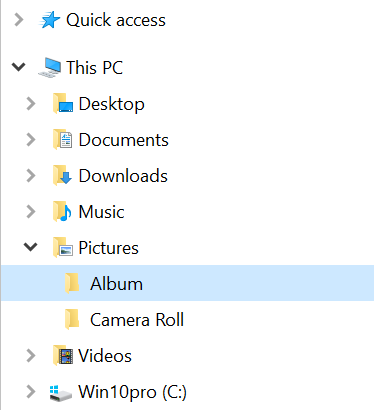
At this point, the album you have created should be highlighted, and its content is shown in the file manager’s content pane (the right pane). You will see nothing, because you haven’t put anything there yet!
You are done with the TO window. Now lets work on the FROM window.
If you do not have a flash drive, or a flash memory card to work with, you can use this web site. Most browsers (the application you opened to get to this web site) will let you copy photographs from the Internet as easily as from a local memory. You can skip over the part about opening a second file manager window. Use the browser window you have open for this class instead. The navigation pane examples, above, are photographs. In the rest of the exercise below, when you are told to select your photo to move, just select one of the example photos. Skip ahead to Step 9, “Positioning of the FROM window” (but you may want to read all the way).
Step 8) If you have changed nothing from the above part of the exercise, the folder icon for Windows File Explorer, on the task bar will show the name Pictures, or the name of your album. To get a second copy of the file manager, you must press and hold the Shift key on the keyboard, then select the task bar icon for Windows File Explorer, then release the Shift key. You should now have a second copy of the file manager window on the desktop. If the file manager opened full screen, select the title bar icon that will Restore Down to a smaller size on the desktop.
Positioning of the FROM window
Step 9) Positioning of the FROM window is similar to positioning the TO window, above. Move your cursor to the title bar of the FROM window, ‘grab’ the title bar (press down with your pointing finger) and drag your cursor OUT of the center of the FROM side of the screen. When you see the ghost appear, drop the window. Both the FROM and TO windows should now each occupy one half of the screen.
Step 10) In the FROM window, you must now use the navigation pane (left pane) of the file manager, to navigate to and select the folder name that contains the photos you want to copy. The photos will appear in the content pane. If you see files and would rather see photos, move your cursor up into the view menu and change to your choice of 'view'.
Step 11) One last check that your FROM and TO windows are set up properly. The FROM window: in the navigation pane (left pane) the folder name holding the photos should be selected (for a ‘virtual’ flash drive select the Photos name) and the content pane (right pane) should be showing file names and/or icons (or thumbnails) of the photos. The TO window: in the navigation pane (left pane) the new folder name to receive the photos should be selected, and the content pane (right pane) should be showing nothing! You haven’t copied anything there yet. (If you chose an existing folder to copy photos to, it may have existing photos there already).
Finally, you are ready to make your copy(s).
NOTE: There are several ways you can perform the copy. Menu driven (window menu or context menu), copy and paste, keyboard shortcut copy and paste, or, for this exercise, drag and drop from the FROM content pane to the TO content pane.
Step 12) Drag and drop allows you to see the file being dragged from the FROM content pane to the TO content pane. If you are using this website as your from window, just position your cursor on one of the photos, select it, then do your drag and drop as follows: Position your cursor on the photo, file or folder you have chosen, press (and HOLD) your select button. Move your pointing device (mouse) until the object you are moving or copying is positioned where you want it to go. In this case, it is the content pane (right pane) of the TO window! While you are dragging the file into ANY new position, there is a text clip that appears near your cursor telling you what you are doing (copy or move), and where you will drop the file when you let go of the mouse select button.
WARNING: If you actually drop your file in the navigation pane of either FROM or TO window, your only chance of seeing it in the TO content pane is if you dropped it on the name of the folder you had selected.
Once you learn what to watch for, a single window is all you need to do either copy or move actions. You select the FROM folder name in the file manager navigation pane, then scroll, if necessary, to view the TO folder name. The FROM folder is still selected in the navigation pane, so the content pane still shows you the file you want to copy or move. Drag the file from the content pane, into the navigation pane and position it near the folder name you wish to copy or move it to. Read the text attached to your cursor to make sure it will go where you want it before you drop it.
One last tidbit. If you are trying to copy to a different folder on the same memory, the computer will automatically choose to move. To change the behavior, press and hold Shift key on your keyboard before you drop the file. The info by your cursor will change appropriately.
![]()
We have briefly discussed containers, and how both humans and computers use them. But lets take a closer look at what a container does for us.
What I would like you to consider, is ‘how can a container contain?’. For instance, if you put a drink in a container such as a tumbler, what keeps the drink IN the container? It didn’t take humans long to realize, that to carry water around, the container had to have a special property: a property that could seal the contents in, no matter how you positioned it. Thus we have given our water containers a cover or cap that we can open or close at will. Now think about all the containers you have used to contain something. Chances are, the best ones all have a cover, cap, door or sliding feature such as a drawer in a desk. If you can close the container, anything you put in your container will stay in (be contained), and anything you don’t want in will stay out.
So from now on, when we talk about containers, they all have the property of being able to be opened or closed.
Now I can stretch your world a bit. Can the following items be considered containers:
- Kitchen Canister Set
- Recipe Box
- House
- Refrigerator
- Oven
- Kitchen Cabinet
- File Cabinet
- Automobile Glove Box
- Road Atlas
- Photo Album
Of course they can!
When humans need a container, most of the time they choose a specific container depending on the item to ‘contain’. For instance: you probably would NOT put a quart of milk in an oven to keep for a week or two. Point is; you put items in a container that is appropriate and easily identifiable when it is time to find the item.
So why would you expect a computer to handle your information differently? YOU get to decide WHERE you want a container (folder) and WHAT to name it. If you need to think of a folder name being the same thing as punching out a personal label maker label and gluing it to a container, do so! Physically, there is a huge difference. Mentally, I want you to see they are the SAME!
I have two examples to further my case:
A. (See #3, below) - If maps and following directions are your thing, think about describing to someone how to get to a specific building somewhere in the World.
B. (See #4, below) - If you are the cook of the family, think about describing to a friend how to find your recipe for Grandmas’ German Chocolate Cake in the kitchen of your home.
NOTE: For these exercises I prepared a USB flash drive (labeled: Flash-Drive to make it easy to find with the file manager!) with appropriate folders to follow the exercises. In a physical presence class, I can pass out copies of the flash drive so the class can follow what I am talking about. In this on-line class I have provided you with two methods of doing the exercises. First, photos you can view as you read through the example. Second, the ability to download and use a ‘Virtual Flash Drive’ complete with the folders of interest, so you can practice the exercises on your own computer.
Also note: The folders I have put on the flash drive are just enough to give you the examples. I don’t have the time or inclination to generate a full version of the atlas or kitchen.
If you wish to follow the exercises with a ‘Virtual Flash Drive’ on your own computer, please click on the ‘Tips & Shortcuts’ button near the top of the left column. Look for and read or print and read the PDF document “Setup Virtual Flash Drive”. Otherwise, read on!
3) Navigating a computer atlas
![]()
Navigating maps may make more sense to a person who is used to using maps or following spoken directions.
In the real world, you would pick up an atlas (book of maps) of your country or the World, thumb through the pages (or use the index) until you found the country or state you are looking for. Many atlases will include small maps of larger cities. Individual city maps are usually also available to help you find the street or building you are looking for.
In our digital world, you are more likely to use a smart phone, tablet or GPS unit to help you locate a particular home or business.
On a computer, the process is exactly the same! Only the ‘faces’ change, that is; the atlas (book form of container) is a folder, country and state maps (folded paper diagrams) are folders, city maps (more paper diagrams) are folders, streets are folders, and buildings are folders!
Many real world physical actions can be simulated in our digital world (using folders) by substituting ‘turn your attention to’ for the real action. Ok, need an example? Change the actions ‘find’ the map, ‘open’ the door or ‘go to the address’ into ‘turn your attention to’ the appropriate folder!
Assume you have plugged one of my USB Flash Drives (That I have labeled: Flash-Drive) into a USB port on your computer. As mentioned above, the flash drive contains a greatly reduced digital form of the USA atlas.
While performing this exercise, please remember, these are photos! Clicking on them will do nothing! A better test for you would be to use a ‘Virtual’ flash drive as described just before the class synopsis above. Then it would work on your own computer.
The Windows File Explorer (file manager) application on your computer is the application you would use to navigate through your maps as follows:
a) In the file manager’s navigation pane (first illustration, below), locate your starting point; the flash drive with the title that contains the words Flash-Drive, in which I have created a digital USA Atlas folder (book of maps) for this exercise.
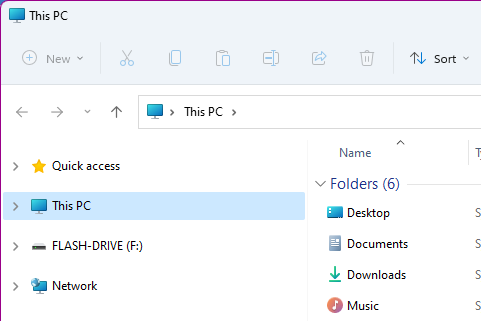
b) Open the flash drive folder by selecting the arrowhead just to the left of the icon and title that includes the words Flash-Drive (the Virtual flash drive has a longer title).
Remember: you can NOT see the arrowheads until you move your cursor into the navigation pane!
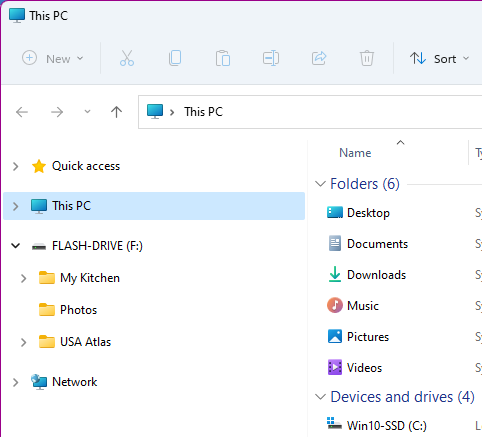
c) Open the Atlas to the map index (select the USA Atlas arrowhead).
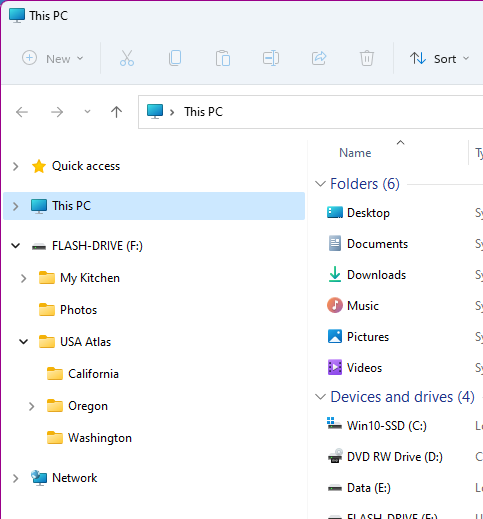
d) The first thing you may see in the Atlas is the index (list of folders) of maps of individual states. Turn to the page for Oregon (select the Oregon arrowhead).
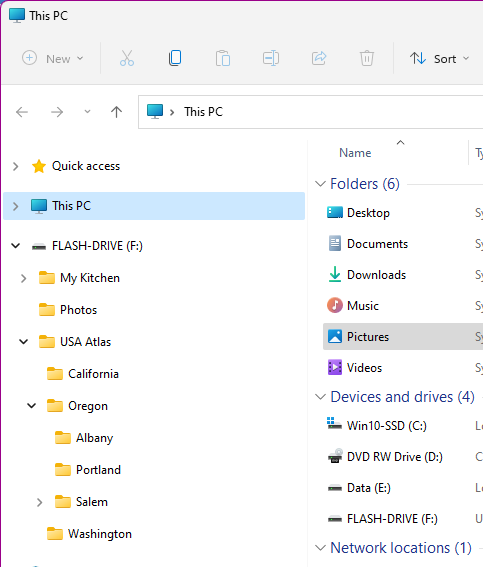
e) On the Oregon map (folders with city names), navigate to the city of Salem (select the Salem arrowhead).
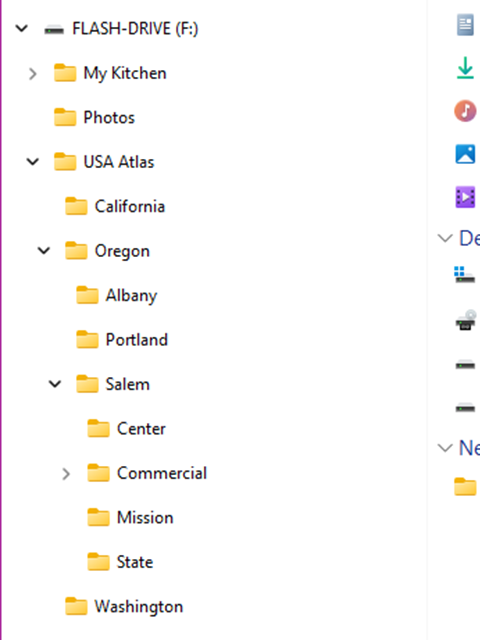
f) City maps show the layout of the city and the names of streets (folders). Locate Commercial street (select the Commercial arrowhead).
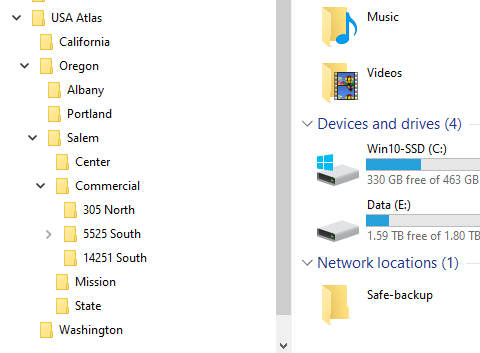
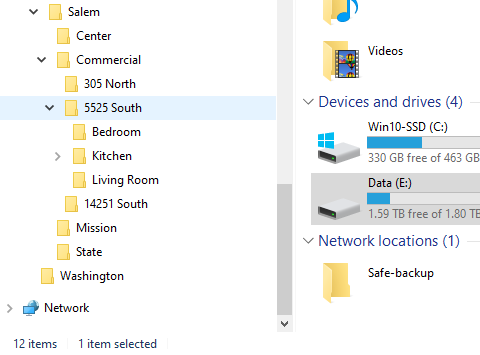
Some city maps will show address approximations. GPS units will take you directly to your address of choice. On the computer map of Commercial street (above), navigate to the building (folder) at 5525 South Commercial, and open its door (select the 5525 South arrowhead).
The next photo shows the ‘expansion’ of the ‘5525 South’ folder. Note that the Kitchen folder has an arrowhead, meaning there are more folders inside. In the original Flash Drives I passed out in the physical class, the Kitchen folder expands into the same Kitchen as shown in part four of the exercise.
When you choose to think of Books and Buildings as containers, using computer folders to represent any container begins to make more sense. It may take some time for the concept to ‘sink in’, but when it does, look out world! You are beginning to become a computer user expert!
4) Navigating a computer kitchen
![]()
Most people don’t talk about navigating their home, even though it IS a process they deal with everyday. These days, many homes have a ‘Family Room’. That implies family activities take place there. Kids play with toys which rarely get put away, adults may have friends over to play games or watch sporting events, the space may get used for wrapping gifts or crafting, to watch TV, etc. In short, you usually cannot walk a straight line when passing through such rooms. You actually have to navigate over, under and around to get through!
In the real world, describing how to find a recipe in the kitchen, or to find a special tool in the big tool box out in the garage, you have to mentally walk through the process before telling someone to get that recipe or tool. I call the process navigation, just like with a map!
Many real world physical actions can be simulated in our digital world (using folders) by substituting ‘turn your attention to’ for the real action. Ok, need an example? Change the action ‘go to’ the kitchen, or ‘take down’ the recipe box to ‘turn your attention to' the appropriate folder!
Again, I would like to remind you: in Class 4, you learned that using the system file manager, you can create folders anywhere in the computer’s permanent storage you care to. Furthermore, you learned you can name the folders (containers) anything you wish. With that in mind, as in the ‘Atlas’ exercise above, assume you have plugged one of my USB Flash Drives (labeled: Flash-Drive) into a USB port on your computer. For this example I have set up a folder to describe your kitchen and everything in it.
While performing this exercise, please remember, these are photos! Clicking on them will do nothing! A better test for you would be to use a ‘Virtual’ flash drive as described just before the exercise synopsis above. Then it would work on your own computer.
Using the Windows File Explorer (file manager) application on your computer, you will use the left window pane (navigation pane) to navigate through your kitchen as follows:
a) In the file manager's navigation pane (photo below), locate your starting point; the flash drive which has the words Flash-Drive in the title, in which I have created a digital kitchen (folder) for this exercise.
Open the flash drive folder by selecting the arrowhead just to the left of the icon and title with the words Flash-Drive as part of the title.
Remember: Using Windows 10, you may NOT see the arrowheads until you move your cursor into the navigation pane!

b) You will find the digital kitchen in the My Kitchen folder (next photo).

c) Go 'into' the kitchen (select the My Kitchen arrowhead).
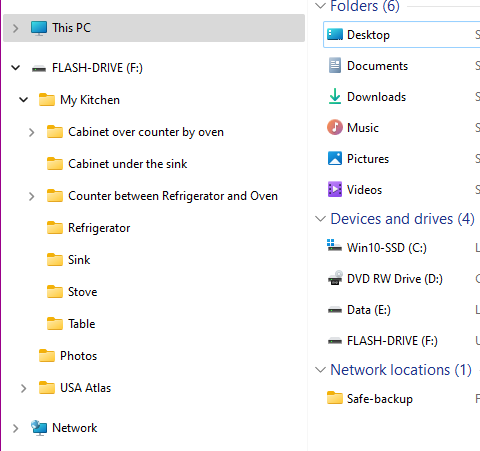
d) Now look around the kitchen (photo above), and find the Cabinet over counter by oven (select the arrowhead for the Cabinet folder).
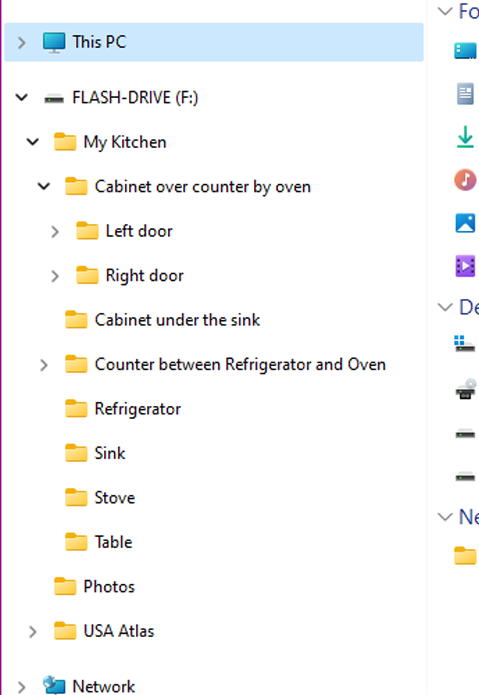
e) Open the cabinet’s Left door (select the arrowhead for the Left door folder).
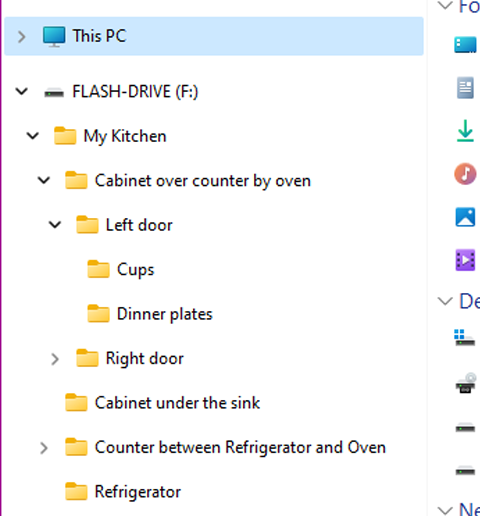
f) Oops! The left door only shows cups and dinner plates. No recipe box here.
Take a good look at the arrowhead to the left of the icon and title ‘Left door’. Notice it is NOT pointing toward the icon! This means the door is OPEN! Select the arrowhead again to CLOSE the door. Then select the arrowhead for the Right door to OPEN it.
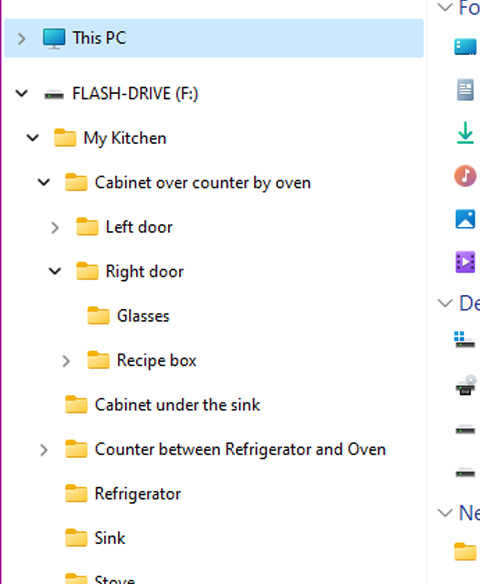
g) We now see there IS a recipe box behind the right door. 'Take down' and 'open' the Recipe box (select the arrowhead for the folder).
At this point in the exercise, I would normally continue walking you through looking for the chocolate cake recipe I have ready. However, at least one member of the physical class made a comment that I thought about. The comment was: “I usually keep my recipe box on the baking counter!”. I decided it was a great opportunity to demonstrate how easy it is to mimic real life using the file manager.
Look back at the above photo. Just two lines below the ‘Recipe box’ is a folder labeled: ‘Counter between Refrigerator and Oven’. Move your cursor to the WORDS ‘Recipe box’. Press down on your pointing finger button (the select button) and keep holding it down! While holding the button down, drag your mouse toward you, while watching the screen. An image appears attached to your cursor and a line of text appears when you drag the cursor over the ‘Cabinet under the sink’. Keep dragging until until your cursor is hovering on the line that reads ‘Counter between Refrigerator and Oven’. Stop dragging when you read that line but do NOT take your finger off the button! (See photo below).
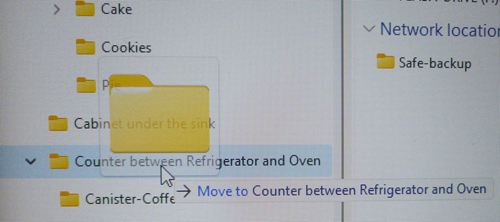
Notice the text line starts with MOVE! If you don’t want to move, but rather COPY, use your other hand to press down on the KEYBOARD key ‘Ctrl’. The text changes to COPY until you let the ‘Ctrl’ key up. In this case we really want MOVE, so let the key go, then raise you finger off the mouse button to drop the ‘recipe box’ on the counter. Notice the box is now gone from the cabinet but is on the counter!!!
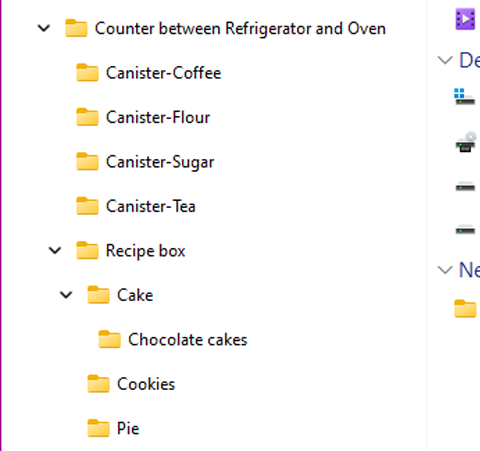
h) As in the photo above, ‘thumb through’ the ‘tabs’ in the recipe box and Choose the Cake tab (select the arrowhead for the Cake folder).
Look to the left of the Chocolate cakes icon and folder in the recipe box, above. There are no more arrrowheads (folders) in the Chocolate cake folder, so to look at the cake recipes (files) in the folder, select the name Chocolate cakes. You will then see the content of the Chocolate cakes folder in the Content pane (right pane) of the file manager!
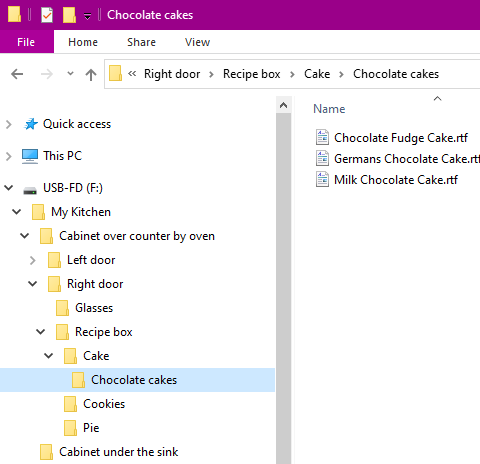
Once you have selected Chocolate cakes (name, not arrowhead), the recipe (file) for Germans Chocolate Cake should appear in the file manager’s content (right) pane.
If you had the real flash drive (the Virtual flash drive will work!), you could Open the file to examine the recipe! (Double click the file name to open it!).

